Ok got your fabric and hook & loop stuff?
Here we go...........Number one is look at your fabric? Is it going one way, meaning is your pattern all going one way, look at my pic of the Santa pillow. Do you see they are all facing you. Look at your pattern and see the pointy end. That is the flap portion of the pillow. Can you flip down the pillow end piece? Do you see you print looking at you the way you want it to look?
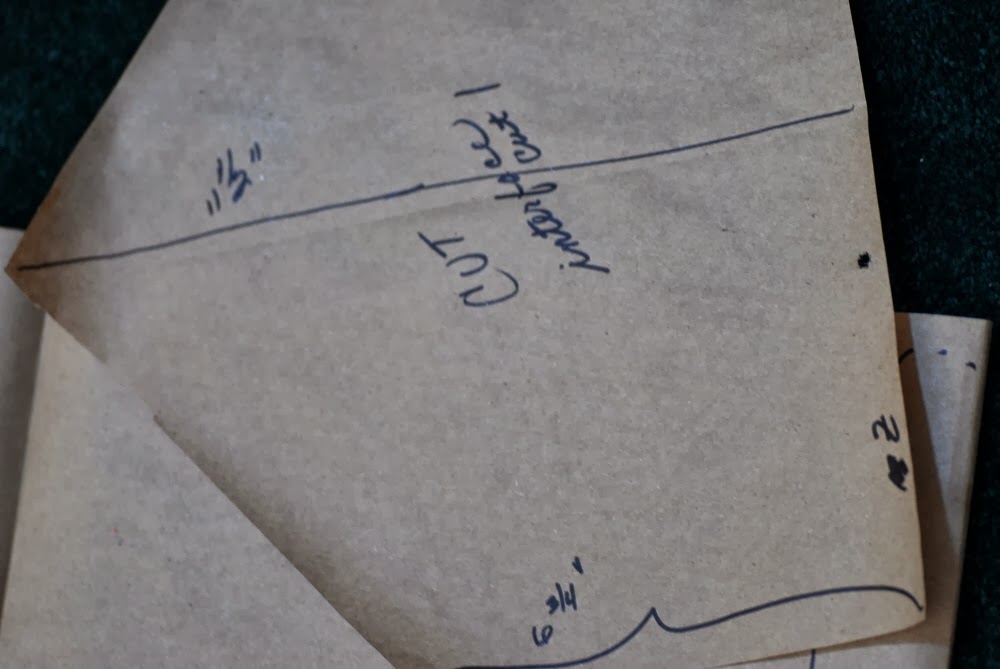
Ok, lay out your pattern, and check out if you can get 2 pillows out of your fabric? Now, lay out your facing it can go anyway you can get it cut out of the fabric. (remember keep everything straight, don't want your pillows having a straight of the fabric moving the pillow)
After you cut the darn things out, you need to put on the loop portion of the hook & loop on the large part of the pillow. I mesured down 6 inches from the middle of the pillow inside (or the straight end of the pattern). Pin the loop to the front of the fabric. Zig-zag the loop onto the fabric (this the first half of the pillow closure.) Zig-zag the end of the pillow, the inside closure of the pillow, to get rid of the raggedy end so it looks finished (inside top of the pillow).
Ok sew up the insides of the pillow by pinning the ends sew just the 12 inches, i like to zig-zag the raw ends inside the pillow, turn the pillow, .
Now check out my picture above. Do you see my hoop portion on the pointy end of the pillow? You will need to add the other part of the hook&loop to your facing. Remember you are going to hot glue the pretty stuff to your pillow by turn up the pointy end of the pillow after we are though sewing this thing together. To make a long story short, put your hook down a tad from the pointy end. Remember you have a seam business plus hot glueing stuff, so I would attach the hoop about an inch below the pointy end.
Wow,have talked my head off, I guess I need to sew up a sliver pillow to make sure I haven't left out a step. Check for updates, since I am half way through this pillow, the rest is easy.
this is the best how to do "craft place", bookmark it. Keep checking I have lots of good ideas
Sunday, September 29, 2013
Friday, September 27, 2013
Christmas pillows or fancy gift bags
Hello, it is getting cooler here and I have thoughts of Christmas loads of ideas. Have you been to Jo Ann's, lately, I got some Christmas items and some stock up items.
I was looking was checking out what a lady was buying in the Christmas fabric section. She reminded me of several friends I have, they are wildly into Quilting. This lovely lady was checking out what she
anted to make for her mother. It seems that she and her mother trade quilted items to celebrate their Christmas, she made placemats last year. I told her about the Christmas pillows, I had made for my friends as extra Christmas presents.
![](https://blogger.googleusercontent.com/img/b/R29vZ2xl/AVvXsEhhE4-8TvZz5nn7ayvyA7IFxrVlAPr8FTI2vHyr2n2JR3HDdvWhJBtnTC_K8G2tWQRay3kPxQg87KvJtIdDGnJr35TnU6jTTnSxYTe430Sk4buUTP0Hf1qk-wTbA0Y5cu-VfD4i8JN25Dq4/s320/DSC_0018.JPG)
![](https://blogger.googleusercontent.com/img/b/R29vZ2xl/AVvXsEjHaM9O6JWlrzOjyHAQr-QKjBFf9mFmS5ZEnewL5dF2PeCne9BC6Dy90ch4a8IuAcizB7OEf6PEEYywirtJhpjj1O-9dSO0J81VaMBukZJ3yWte_8voUqxOJnn5L2I-GNU4iaolnGb0pV0a/s320/DSC_0019.JPG)
![](https://blogger.googleusercontent.com/img/b/R29vZ2xl/AVvXsEiaJNLzis8Y0XPHwvh_HFUWtXdN8nwQ53AOAJ3gq0extfhklocxeGduROQIOH6Kd4s4eEQB2c1eyDXt9LeAsh-Kb7h_q7XjSrm0qr9xMaVgeEGAAWMWyKFPFqKnJ3oDFJGnoQ1fS4Nm0rJn/s320/DSC_0009.JPG)
This is the classic envelope style pillow. I like it made with Christmas fabric, you simply need to add whatever style of decoration to the front of the pillow. My Friend Jean thought of adding towels inside of the pillow to fatten it out instead of buying 12x12" pillow forms. She is so cleaver, I didn't mind paying the price of the pillow forms especially since they were on sale or I was able to use a 40% coupon on them. She was smarter then me, because after Christmas and New Year's celebrations were over, I needed to store the stupid things. Well, guess what, my friend just needed to take out her towels and put them back into the linen closet and like magic roll up the fabric pillows.
I originally used this idea to make gift bags for my crochet scarves I have for sale on my esty.com store. Think about that as a cute gift bag with a small hang tag with instructions on putting a pillow form in it and putting it on your bed or on the occasional side chair.
You simply can make the pillows as the doing the following.
2 1/2 yds of 36" or 45" fabric.
1/2 yd of interfacing craft type
some hook and loops fasteners (have seen colors at Jo Ann's other than black or White.)
gold or silver ribbon with wire on the sides.
hot glue for ribbon
cut out a paper pattern as measuring 37" x 12/1/2..( I like to use home depot brown paper in the paint section. It is just right for painting projects, it is used as masking off paint problems, I use it for making patterns out of it.)....you need to add a envelope pointed flap for the front closure, which would be 12 1/2 by 12 1/2 with slanted corners coming to a point.
You will need to make a facing for the flap so I traced the pointy end of the pattern to make the facing piece but I added a inch to the end of the facing. You will need to make a interface, use iron on interfacing (this is a pretty stiff interface product or the craft type)
You would need to have some interfacing to cut out for the front flap and and additional front flap closure for the inter-covering. see the inside picture of the pillow.
I will give the written instruction on sewing this project. This week ...stay tuned.
You can also use this idea for a larger version, for your bedroom to dress up your bed spread or use this pattern to add some glitz to your bedroom. I will be using that idea in another blog in January. So once again please bookmark me so you can come back again for more ideas.
Here's a money savings idea, my new friend in Jo Ann's thought to check out on the After Halloween sales, for some really glitz fabric to use as Fancy Christmas pillows or gift bags. Did you just say, GIFT BAGS? yes that is right, you can use these pillows as gift bags with a cute note inclosed inside the bag. Use this as a pillow on your bed.
See my Esty.com shop to see my ideas for this one?
I was looking was checking out what a lady was buying in the Christmas fabric section. She reminded me of several friends I have, they are wildly into Quilting. This lovely lady was checking out what she
anted to make for her mother. It seems that she and her mother trade quilted items to celebrate their Christmas, she made placemats last year. I told her about the Christmas pillows, I had made for my friends as extra Christmas presents.
This is the classic envelope style pillow. I like it made with Christmas fabric, you simply need to add whatever style of decoration to the front of the pillow. My Friend Jean thought of adding towels inside of the pillow to fatten it out instead of buying 12x12" pillow forms. She is so cleaver, I didn't mind paying the price of the pillow forms especially since they were on sale or I was able to use a 40% coupon on them. She was smarter then me, because after Christmas and New Year's celebrations were over, I needed to store the stupid things. Well, guess what, my friend just needed to take out her towels and put them back into the linen closet and like magic roll up the fabric pillows.
I originally used this idea to make gift bags for my crochet scarves I have for sale on my esty.com store. Think about that as a cute gift bag with a small hang tag with instructions on putting a pillow form in it and putting it on your bed or on the occasional side chair.
You simply can make the pillows as the doing the following.
2 1/2 yds of 36" or 45" fabric.
1/2 yd of interfacing craft type
some hook and loops fasteners (have seen colors at Jo Ann's other than black or White.)
gold or silver ribbon with wire on the sides.
hot glue for ribbon
cut out a paper pattern as measuring 37" x 12/1/2..( I like to use home depot brown paper in the paint section. It is just right for painting projects, it is used as masking off paint problems, I use it for making patterns out of it.)....you need to add a envelope pointed flap for the front closure, which would be 12 1/2 by 12 1/2 with slanted corners coming to a point.
You will need to make a facing for the flap so I traced the pointy end of the pattern to make the facing piece but I added a inch to the end of the facing. You will need to make a interface, use iron on interfacing (this is a pretty stiff interface product or the craft type)
You would need to have some interfacing to cut out for the front flap and and additional front flap closure for the inter-covering. see the inside picture of the pillow.
I will give the written instruction on sewing this project. This week ...stay tuned.
You can also use this idea for a larger version, for your bedroom to dress up your bed spread or use this pattern to add some glitz to your bedroom. I will be using that idea in another blog in January. So once again please bookmark me so you can come back again for more ideas.
Here's a money savings idea, my new friend in Jo Ann's thought to check out on the After Halloween sales, for some really glitz fabric to use as Fancy Christmas pillows or gift bags. Did you just say, GIFT BAGS? yes that is right, you can use these pillows as gift bags with a cute note inclosed inside the bag. Use this as a pillow on your bed.
See my Esty.com shop to see my ideas for this one?
Wednesday, September 25, 2013
Here is a picture of two vase that have been filled with the resin. I stirred the stuff with a cooking skewer, I use them for lots of things involving crafts. It was easy to use, and I also used the thing to punch out the bubbles that may have occurred during the
pouring into the vase. I only had two, so that made it easy to make this vase look so good.
Here is a picture of the finished product. I love them.
I also rechecked the original vase I had made several years earlier. I like the baby breaths so much better.
I had used air fern in the original...it is still there some of the fern stuff, those little green tiny pieces had fallen into the resin, however, you would not have to change out the baby breath. I am thinking if I gave this as a gift I would tie a card on the vase with ribbon and tell them, "no need to add water, you may want to change out your babies breath every once in a while. Baby breath will dry very well. You want it to appear real.
I found a nice rose at Walmart Supercenter, for around $2.00, they also had a carnation there also.
"
Sunday, September 15, 2013
Rose pict's and Vases with rocks
Well after some problems with my camera, it seems like every picture I took was blurry and out of focus. I was thinking I was getting the shaky so I even put my camera on a tv tray to hold it steady. Lordy lordy, I needed to use my reading glasses to focus. Here are some of those wonderful pict's. I took a pict of my rose to show the slight bend in the stem and the close-up of the rose to show the art of reality, but I am really proud of these pink roses.
The vase pict is showing the pile of rocks I are using prior to pouring the resin into the vase and the crystal pile. I was trying to show how much I used for each vase.
Saturday, September 14, 2013
Fabulous Rose Bud Bases for U and BFF
I have taken two more pictures of my third vase with some ideas for you
This is a picture of the third vase with simply some old filler I had in a table arrangement. I added baby breath to it and it really soften the small flowers.
The sunflower doesn't particularity look entirely real, but it is in the season. Perhaps you can make the third one in a fall theme, to charm up your desk? I really can't say enough about babys breath, to me it seems like it adds so much to to the entire flower vase. You don't need to have the stem of the baby breath touch the bottom of the vase. I have just placed them inside the vase, since it just seems to fill in the vase, and you may want to change it out from time to time.
I need to give out a rule of thumb for doing up the bud vases. Measure your vase, for example 12 inches, you should note the top of the entire vase should be no taller than 24". That would include the ting-ting, filler, baby breath and the rose.
What I am saying is the total vase shouldn't be any taller than 24 inches(if your vase is 12 inches tall). It is very easy to go over board with ting-ting. You need to think of the proportions of the item you are making. I also want to note right now..... I put a bend in the rose stem near the top. Do you think every rose is perfectly straight?
When you cut your rose use those side cutters, and you will need to bend the stem to get the darn thing to cut through the stem, but please save the bottom half of the stem. You can use it for hot glueing some wispy filler. They always come in handy for those little extras you may need for the next project or to cut up some of the filler so your bud vase doesn't look to much filler (you may not see the rose, it is the main focus of the vase).
Ok now we are ready to add the resin. Cut off the top of your 10 or 12 oz water bottle. pour equal amounts of both resins into the bottle. (you can practice with one vase so mix up a third of each bottle, but you will need to use up the entire contents very soon, within days). You will need to stir the two together, not like you are making a cake or beating up egg whites. You need to stir so you do not make bubbles, remember when you had to blend in egg whites into angle food cake mixes? You have your vase empty with the exception of the rocks or crystals. Pour your resin mixture slowly down the center of the vase, don't get any resin on the side of the vase. fill to the level you think water looks good. You don't need even to cover the rocks. Think real what you have seen in bub vases sitting on your desk. Watch out for bubbles? Do you see bubbles in a real bud vase?
Then reassemble your flowers in the vase, I like to put the rose in first. Load up the filler and ting-ting. Finish up with adding the baby's breath and wiring the ribbon bow on the the rose stem or you can use a plastic card holder if you brought one from your florist. Do you have a card to attach to the plastic thing. Put thank you or with lots of love. Do something silly?
Lets add up the cost of this project
rose (2) @ 3.95 7.90
Vases (3)@ 1.00 3.00
rocks & crystals @ 1.00 2.00
baby breath 2.50 2.50
filler (found in craft closet) .00
resin water 12.99 minus 40% 7.80 (used a 40% coupon @ Jo ANN'S)
ribbon 1.00
total 24.20 divide by 3 8.07
I think that makes a very good gift price.
Friday, September 13, 2013
Rose plus baby breath makes it just perfect
Hello once again, I have done my shopping and got to the last step of this project.
this is the final run though, I have put everything I think will go with the bud vase. Check out the picture.
I got some baby breath from Vons florist this morning and I got two sprigs of it for $2.50. This is more than enough for 3 three bud vases. I did get some resin water from Jo Ann's. I found that the manufacture of this
stuff, has a made another type of resin. This type is cooked on the stove in boiling water, you pour the stuff into your vase then have to heat it again to get the bubbles out of the water. I went with the $12.99 type that is still mixed together, stirred together and then poured down the middle of the vase.
I have a picture above that is empty vase to show you the vase next to it, has rocks in the bottom. I think I like the river rocks..look better than the crystal drops. Check out the above pictures to see the difference. Looking again
I think I also tend to go for the hot pink ribbon rather that the pink polk-a-dot ribbon. What do you think?
I have arranged the vases the way I wanted it, to look, prior to pouring the resin water. You will need to take all the items out of the vase with the exception of the rocks.
Here is a list of the items used in the vase...
rose, curly willow (2 twigs) 2 ting-ting, several filler stuff (the green filly stuff), baby breath 2-branches, small gauge ribbon
Please note I really like the baby breath, it makes the whole thing look so professional, it gives it a soft look.
I know I can hear you saying, they will die? Yes, they die and dry very well turn a bit yellow or ivory color.
If this one is for you, I would think about every 6 months you could spring for a new bit of baby's breath, to freshen it up. Tomorrow, will do the resin. You will need to gather up a used drinking water bottle, wooden popsicle stick.
The water bottle is the type you drink from at your desk. You are going to cut the top off so you can mix the resin in the bottle, stirring with the popsicle sticks or a bamboo skewers.
Wednesday, September 11, 2013
What about Curly Willow and ribbon
Hello
I have been shopping for vases and took my own advise and brought another Pink rose. I will be buying the clear resin stuff that makes the water, tomorrow, so we can get going with this big to do. I am going to use in one vase those clear crystal flat marble like items, and will use tumbled stones in the other one. Also have an idea for another type of flower, so you can get you mind to wandering in to the craft ideas. Hope to give you some good pictures of what all three vases look like.
I think it would be a good idea at this time to invest in some curly willows, I have seen them in all the standard craft stores. They run from $6.99 to 9.99, but remember you will be using them in several other projects in the future. (this is a small bunch of them0
What color of rose or flowers did you buy, think about a small bow to be attached to the vase. If that is not your speciality, you could think about buying one from the grocery store florist. If your going that way, buy a plastic card holder and ask for a card. If we are going to have it look just perfect, go all the way............
![](https://blogger.googleusercontent.com/img/b/R29vZ2xl/AVvXsEiCHfMrHCEnVyEejAqwTW75Q7D1tM2geERggOBhEucZfyJ2AgZbgVaPxDecszU8GiVy3psSuzv3DZJ2ezJ6cRYAvDUzBgEoNeaBge4dNrmC9VUV_OiQx-61VyHGHvLmYsW9_z99ciZGbooy/s320/DSC_0006.JPG)
I have been shopping for vases and took my own advise and brought another Pink rose. I will be buying the clear resin stuff that makes the water, tomorrow, so we can get going with this big to do. I am going to use in one vase those clear crystal flat marble like items, and will use tumbled stones in the other one. Also have an idea for another type of flower, so you can get you mind to wandering in to the craft ideas. Hope to give you some good pictures of what all three vases look like.
I think it would be a good idea at this time to invest in some curly willows, I have seen them in all the standard craft stores. They run from $6.99 to 9.99, but remember you will be using them in several other projects in the future. (this is a small bunch of them0
What color of rose or flowers did you buy, think about a small bow to be attached to the vase. If that is not your speciality, you could think about buying one from the grocery store florist. If your going that way, buy a plastic card holder and ask for a card. If we are going to have it look just perfect, go all the way............
Saturday, September 7, 2013
Rose 4 BFF Vase
I just thought about the vase, do you have several around the house? You may have gotten with flowers?
Give them a second look, do they have a smaller neck opening? This is not a project that is for a bouquet of flowers!
I have gone to the $tree store again, found some vases, especially the tall thin vase like the one pictured in the last post. This $.99 item is to tall, I also brought a vase that was the right height but the opening is to large.
Thinking of going to the thrift store here in my neighborhood to see what they have. Most of these vases are some what grungy...so don't worry....if you buy some, put some automatic dish soap inside the vase mixed with hot water. Let set for a day or so and magically everything is gone.
I was able to buy some clear stones to fill the vase, going to use as ballast, so the darn thing will not tip over. They also had some rocks in a small size and pea size, you could think about these also.
I was not sure what is being given to folks as single bud vase. Hence I when went to the grocery store, to check out what they are selling, in the floral department. They had lots of vase for sale and flowers in vases also.
Don't worry, I am going to do all this thinking, but you may want to check out your grocery store floral dept to see what is now being given out as bud vase arrangement. We want to make oursbetter than ordinary after all this is a gift to a BFF. It has to be special.
Friday, September 6, 2013
Rose 4 BFF
Make a perfect gift for any BFF.
Do you have a work associates, church, good friends or a favor you need to repay? This is the perfect gift for any of these situations.
To make this item... the very first item is a rose or flower that looks real (really gives you that thought the flower is living and breathing). If it is not looking truly living real, then this gift is not for you.
![](https://blogger.googleusercontent.com/img/b/R29vZ2xl/AVvXsEiCHfMrHCEnVyEejAqwTW75Q7D1tM2geERggOBhEucZfyJ2AgZbgVaPxDecszU8GiVy3psSuzv3DZJ2ezJ6cRYAvDUzBgEoNeaBge4dNrmC9VUV_OiQx-61VyHGHvLmYsW9_z99ciZGbooy/s320/DSC_0006.JPG)
Years ago, I found a good looking flower at a floral supply house, see the pic, it is not very enduring...it is a funky color. At the time it was a very popular color. So you ask who cares? Here is my story, listen carefully and hopefully you will learn from it........
I worked in a large office and I always pass by a cube held by a manager, on her desk was a beautiful rose in a cut glass crystal vase. I thought she had a standing order with a florist, because this rose always looked fabulous. Water in the vase and never a faded bloom. Sometimes I would stop in the office to check out the flower, especially when the manager had gone on vacation. She let me sit in for her. The darn thing was not real. Thank you Brenda for having this rose in your office.
The moral to this story is if you want to be the envy of your office or have given the best gift to your BFF, get the best flower. Always pick a color that will not go out of season. Brenda's rose was soft pink, I think it was her signature color.
Having looked at all the craft store around here, I found a large section of roses at Hobby Lobby, so I went with soft pink. You can go wrong with that color.
If you don't find the right type of flower than is a waste of time. Jo Ann's had some flowers, but they didn't have roses. It is up to you.
Next installment is the vase, and filler. Flower first than the rest, oh, by the way, you will need to buy 3 flowers, since the resin you will be using for fake water is mixed as a one time process, and it will make 2 or 3 vases of fake water. Go with the 3 or just make one and throw out the rest of the resin.
Do you have a work associates, church, good friends or a favor you need to repay? This is the perfect gift for any of these situations.
To make this item... the very first item is a rose or flower that looks real (really gives you that thought the flower is living and breathing). If it is not looking truly living real, then this gift is not for you.
Years ago, I found a good looking flower at a floral supply house, see the pic, it is not very enduring...it is a funky color. At the time it was a very popular color. So you ask who cares? Here is my story, listen carefully and hopefully you will learn from it........
I worked in a large office and I always pass by a cube held by a manager, on her desk was a beautiful rose in a cut glass crystal vase. I thought she had a standing order with a florist, because this rose always looked fabulous. Water in the vase and never a faded bloom. Sometimes I would stop in the office to check out the flower, especially when the manager had gone on vacation. She let me sit in for her. The darn thing was not real. Thank you Brenda for having this rose in your office.
The moral to this story is if you want to be the envy of your office or have given the best gift to your BFF, get the best flower. Always pick a color that will not go out of season. Brenda's rose was soft pink, I think it was her signature color.
Having looked at all the craft store around here, I found a large section of roses at Hobby Lobby, so I went with soft pink. You can go wrong with that color.
If you don't find the right type of flower than is a waste of time. Jo Ann's had some flowers, but they didn't have roses. It is up to you.
Next installment is the vase, and filler. Flower first than the rest, oh, by the way, you will need to buy 3 flowers, since the resin you will be using for fake water is mixed as a one time process, and it will make 2 or 3 vases of fake water. Go with the 3 or just make one and throw out the rest of the resin.
Wednesday, September 4, 2013
Here is my button doll prior to getting her new hat. I same to find myself using cups, plates or glasses to get a good circle rather than using a compass. I have found a glass measuring 3 1/2 inches but liked a drinking glass that measures 3 3/4 inches. So I circled the glass and cut out the darn thing out of interfacing. I tried using a quarter (the 25 cents thing) for a place for its head to fit though the center. I found that size to small so I cut the hole a bit bigger. See the pic. Check it out to see if you like the way it fits, does it cover the face? Or does it fall down past the face.
If it doesn't fit don't use it, start over. Now if you are doing a hat for a larger doll, start with brown paper or card stock and wrap a piece of string to measure to little cuties head. This will be your judge of the size of the plate you will use to make your circle for a hat. Use the string to measure the center of the hat to gauge the hole needed to fit the dolly head.
I cut three circles for the top, middle, and the underside of the hat. If you have matching fabric that is great but if not go with plain fabric that blends with the dolls dress. I used white felt for the bottom, interfacing and black quilting fabric. I glued the three together with white glue, but it didn't glue very well, so I hot glued the thing together. I cut around the outside so the three pieces match. I also ran around a black marker to cover up the white interfacing in the middle. Now is the fun stuff. I twisted up the front of the hat and started adding all the stuff that makes the hat interesting.
Tuesday, September 3, 2013
Doll hats are for you or someone of interest?
I have been making button doll hats as part of on going prototype development to have the cutest button dolls. It seems like in my office there was about 2 to 3 button dollies on more than several ladies desk. They were sold at most of the charity boutiques. I would go and buy straw doll hats at the craft store, but this would not work very well, since the straw insides of the hat would catch on the dollies fake hair. So this has been like chasing a crazy thought to improve on making my button dolls look more glamour.
These hats will fit any doll, Do you have an American Girl doll? Well, these instructions or directions will fix just about any sized doll.
![](https://blogger.googleusercontent.com/img/b/R29vZ2xl/AVvXsEhZFLhOyvj_vxT0vfuzGqpUt-d4tjHfEBF3bWjwz3Wbv2cw6klTHHoI-7_ylz0eS_R2QvXuoK2phu9Q3k2Clnh0R3sddWDiOi9gsoyQwyOc75aDmSMo_MiDPPIUmbuEAkjVAhkmmV2bEr4l/s320/il_170x135.377921585_esb6.jpg)
Stay tuned ...bookmark me. Working on the directions.
You will need interfacing for crafting, for button dolls, I brought 1/4 of yard. This is the very crafty stuff, it is titled as crafting, something that is out this time of the year, since you can make halloween masks.
Pick out a quilting fat quarters in the color of the hat you want to make. I brought some felt that was glittery.
ok, off to take some pic's for you ...I like to add feathers to the whole thing, so you could check those out in your tip to a craft store or fabric store. Let your mind wonder at what you would like to see in a doll hat. Buttons?
Left over scrapbooking small items? Jump out of the box with ideas.
Subscribe to:
Posts (Atom)